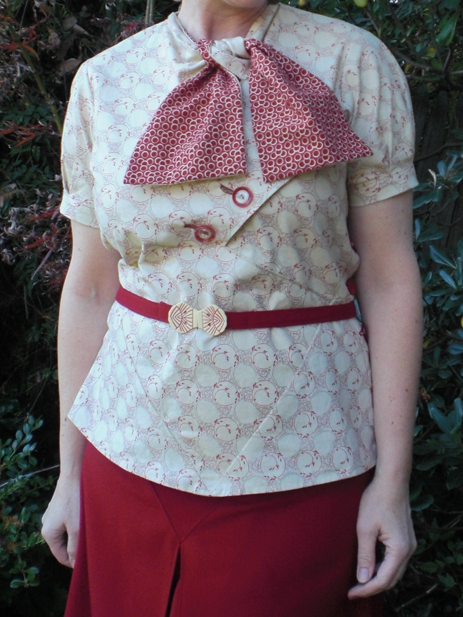
This outfit all began after a short trip around the corner to my local crafting consignment shop, where I found the amazing fabric for the blouse featured in this post. The print (Asian Art Deco?) was irresistible and there was just enough of it to scrape out a blouse. Next up was a search for the perfect 1930's blouse pattern. That proved to be a little easier said than done, as I had trouble finding a blouse pattern that suited the fabric. I did settle on a gorgeous 1930's dress pattern with a fabulous neck bow, that could be converted into a blouse and skirt.
Of course there was also the dilemma of what to pair it with. While searching through my stash, this beautiful red wool crepe jumped out at me. The length of fabric had been waiting for just the right moment and and that moment had arrived. AND there was enough to make a skirt and a coat as well.
Going back to one of my favorite Etsy shops, VintagePatternGirl (Vintage pattern lending library), I found the perfect 1930's coat pattern. It's somewhat reminiscent of the long coats that Miss Phryne Fisher wears (on Miss Fisher's Murder Mysteries), so that was a selling point as well as the flared sleeves and interesting shoulder/armhole seams. The coat also has another charming little detail - 4 pin tucks at the back neck. It's all the little details that really make these styles so interesting.
After searching for an Art Deco belt buckle to coordinate (most were out of my budget) and a failed attempt at a covered belt/buckle set (too wide and 80's looking in the end), I found this darling buckle online for just about $13 including shipping. Such an amazing find from efinegifts on etsy.
Read Ahead for how I put it all together -
blouse
1. I measured the dress pattern and increased the waist and hip slightly to accomodate my measurements.
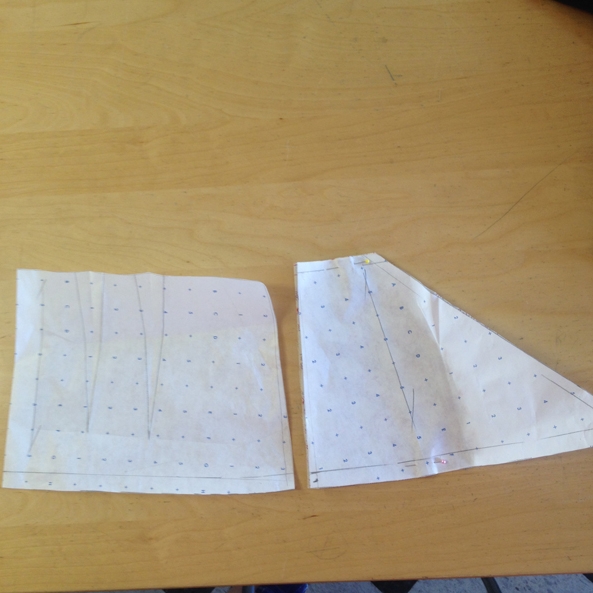
2. Then I traced off the top part of the skirt, front & back. Starting on the front, I traced from the bottom/start of the v-point, across the top edge and along the side seam to the hip, about the same distance down as the v-point, measured from the CF waistline. For the back. I traced off the side seam, top edge, and center back edge. The length of the back should match the front at the side seam and then blend into the center back edge.
3. These new pieces become new pattern pieces for the blouse.
4. For the skirt, I used the skirt pieces from the dress and then traced off the center v-section at the waist seam. This will get placed on a center fold. An additional pattern piece was created for the waistband, based off of the pattern waist measurements and including underlap for button. My pattern piece measured 4" wide x 34" (32" for the waist, 1" for the underlap and 1" for the seam allowance)
5. The pattern was cut using the bodice portions of the pattern + the new "skirt" or "peplum" patterns.
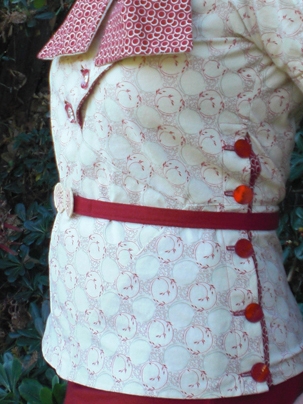
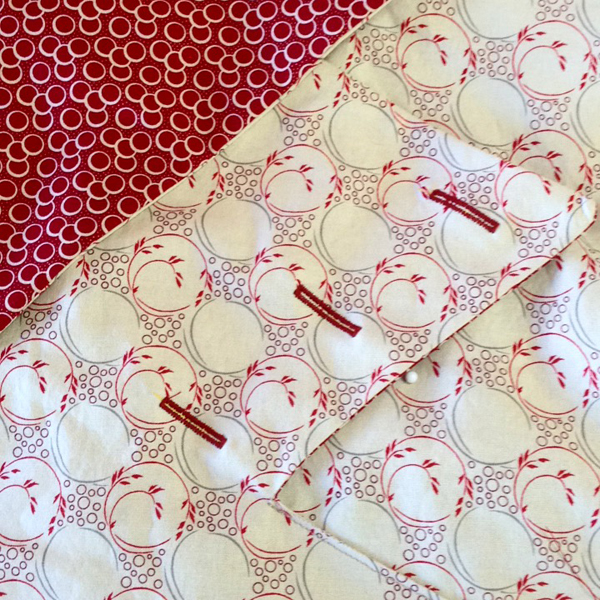
6. I made contrasting buttonholes along the front edge and two tone red/clear plastic vintage buttons.
7. A side placket for buttons and buttonholes was added to the wearer's left side, using the contrasting fabric I used for the bow. There was not a piece big enough to make a placket from the main fabric.
skirt
1. The skirt sewed up exactly as the instructions indicated (from the waist down) with the exception of adding a waistband and zipper.
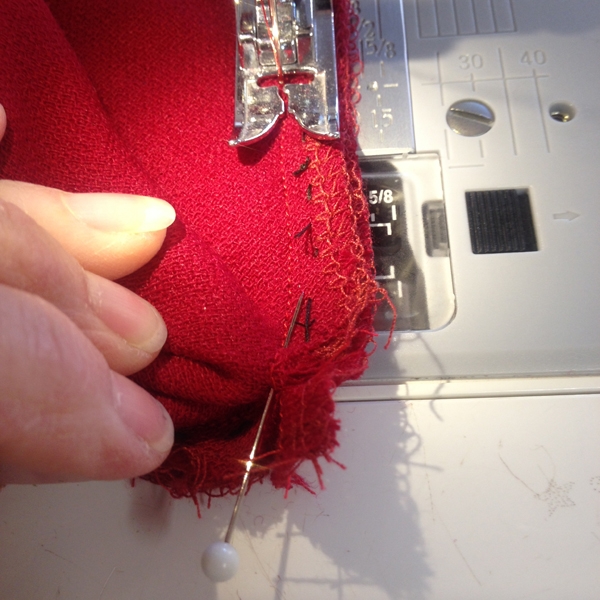
2. I'm adding these photos below, to show how to insert the V- shaped piece at the front.
1. after creating the pleats at center front and basting the seam allowances together, I stitched a line of tiny stay stitches along the seam allowance with the center stitch landing between the pleats.
2. I added a row of tiny stay stitches to center v-section, along the seam allowance on the v-shaped edge. Then the two seams were pinned along their corresponding stitch lines, ending at the v-point.
3. The center v-section and front skirt are sewn together along the pinned seam ending at the bottom of each v point, precisely. Make sure to pin in the direction you are sewing so that you can take the pins out as you go.
4. Before sewing the other side of the v shape, the skirt is clipped along the seam allowance, at the center of the v.
5. With the center v section on the bottom bend the skirt section around to the other side of the v and pin together along the stitch lines.
6. Stitch together along the stitch line ending at the v point, precisely and taking the pins out as you go.
Here is a closeup photo of the V-point from the skirt side.
I pressed the seam allowance towards the skirt (away from v-insert) and top stitched on the skirt side, 1/8" from seam.
Coat
Each piece is interlined with cotton flannel
The sleeve lining is sewed to the armhole and then the body lining was hand finished at the armhole, covering up the seam.
I trimmed away the flannel interfacing at the armhole seams to reduce bulk.
I measured the coat pattern and realized NO ADJUSTMENTS WERE NEEDED. Can you imagine my joy? It sewed up really well and I used the following techniques to help give the fabric a little more warmth and body:
1. I interlined each of the outside (shell fabric) pieces with cotton flannel. The only exception to this was the front facing and collar pieces which were interlined with silk organza. The flannel adds warmth and gives the fabric body and weight, while the organza adds more crispness and is thinner, reducing bulk. The interlining was pinned in place and then hand stitched together. I hand stitch it because it's easier to control and keep the fabric together. No bubbling or slipping off track. When it's machine stitched, that can happen more easily.
2. Instead of stitching the sleeve lining to the body lining, I stitched it into the sleeve at the armhole and then finished it off with the body lining, at the armhole, after the body lining was attached.
3. The flannel was trimmed from the seam allowances (after joining the seams) in the armholes to reduce bulk.
4. The hems (both sleeve and bottom hem) were pressed to the inside and catch stitched in place. Then the linings were pinned in placed and hand finished with a slip stitch. (not shown).
Here are the specific details for the entire outfit:
- Hat - Alameda Vintage Fashion Fair
- Fabric for blouse + red shell buttons - Recrafting Co.
- Pattern for blouse and skirt - T7357 - Vintage Pattern Lending Library
- Pattern for Coat - T1418 - Vintage Pattern Lending Library
- Additional fabric & trims (including clear/red plastic buttons) for skirt and coat - personal stash
- Belt buckle - EfineGifts
- Shoes - Remix Vintage Shoes - Style Trieste
- Gloves - previously owned by my Grandma Fran
- Earrings - Unknown Etsy vendor from 10 years ago
- Stockings & Knickers & Girdlette (not shown) - What Katie Did
Overall, I'm VERY happy with this outfit and can't wait to wear it to our neighborhood caroling party next weekend. I think it's fairly perfect for the cooling northern California weather.
Until Next time, Happy Sewing!
xo
Jennifer
